This wonderful side dish literally takes about 5 minutes to make & it's so healthy & delicious!  In a chefs pan or a large pan with sides, saute 3 minced garlic cloves in about a tablespoon of olive oil over medium heat for 1-2 minutes. (You don't want to brown the garlic.)
Sunny Side Up Eggs & Bacon
Nothing gets my morning started better than the smell of bacon cooking (and freshly brewed cup of coffee)! These breakfast classics are a favorite in our house & they are so easy & quick to make!! My favorite way to cook bacon:
Preheat the oven to 400 degrees. Place the strips of bacon on a sheet pan, try to not let them touch or they will stick together while cooking. Some people like to place the bacon over a slotted rack on the sheet pan so that the grease drips down. But I think it tastes much better & gets a better texture when you let the bacon cook in it & drain the excess at the end.  Cook for 10-15 minutes, just under cooked. Then flip the pieces & return to the oven to cook for another 5-10 minutes, or until your desired crispiness.
Sunny Side Up Eggs!
Labels:
Breakfast and Brunch,
eggs,
Entree,
Pork,
Quick and Easy
Panko & Parmesan Crusted Chicken Breasts
This is every one's favorite chicken! The Panko Bread Crumbs & Parmesan Cheese give it a crunchy, delicious texture & pan frying keeps it tender & incredibly light tasting. The thin chicken breasts cook up so quickly making this a great dish for any night of the week!  Ingredients:
2 Boneless, Skinless Chicken Breasts
1/2 cup All Purpose Flour
3/4 cup Plain Panko Bread Crumbs
1/3 cup freshly grated Parmesan Cheese
1/2 tsp dried Italian Seasoning
1/2 tsp Garlic Powder
1/4 tsp Paprika
Salt & Pepper
1 Egg
2 tbsp Olive Oil
2 tbsp Butter
Directions:
Preheat the oven to 200 degrees. Place chicken breasts between 2 pieces of plastic wrap or parchment paper & pound thin, about 1/4". As you can tell, these make huge servings. You could easily cut the breast in half & make 2 servings out of one! Set up your assembly line. Place the flour on one plate, lightly beat the egg with 1 tsp of water on another plate. Combine the Panko, Parmesan & seasonings on the third plate. You could substitute regular bread crumbs but I think the Panko gives it a much crispier & lighter texture. Dredge the thinned chicken breasts (one at a time) through the flour, then the egg, then coat in the Panko & Parmesan mixture.
This is my version of another Ina Garten (the Barefoot Contessa) creation, Parmesan Chicken.
Labels:
chicken,
Entree,
Parmesan Cheese
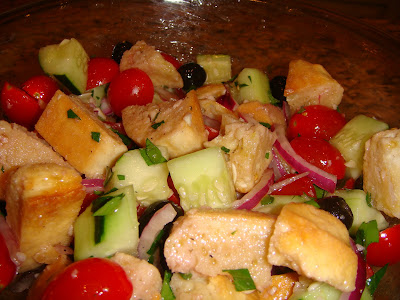
Panzanella Salad
This is a salad that even the pickiest eaters love! Chucks of crusty bread marinaded with summer veggies- delicious & super easy! It makes the perfect side for back yard barbecues or picnics since it doesn't require any refrigeration!  Ingredients:
(For the Salad)
1 Italian or French loaf of Crusty Bread
1/2-3/4 lb Grape or Cherry Tomatoes, cut in half
1 medium/ large Cucumber, cut in 1/2" cubes
1/4 medium Red Onion, sliced thin
1/2 cup Black Olives
1/4 cup Parmesan Cheese, cut into pieces
1 tbsp Fresh Parsley, chopped
Extra Virgin Olive Oil
Salt & Pepper
(for the Vinaigrette)
2 cloves of Garlic (minced)
1/4 cup Red Wine
1/2 cup Extra Virgin Olive Oil
Salt & Pepper
Directions:
Preheat the oven to 350 degrees. I used a mini french baguette, but I've also used Italian boules or Sourdough loaves in the past. Use any crusty bread that you like.  Cut the bread into 1/2" cubes. Place on a sheet pan, drizzle lightly with olive oil & season with salt & pepper. Bake at 350 degrees for 3-5 minutes on each side. Remove from oven & set aside to cool.
Labels:
Italian,
Quick and Easy,
Sauces,
Side Dish,
tomato
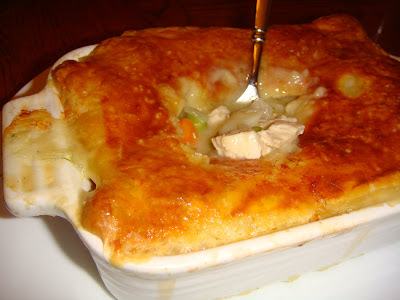
Individual Chicken Pot Pies
Homemade Chicken Pot Pie- It's thick, creamy, delicious, and I bet it's a lot easier to make than you think! This is a fun entertaining dish too. It's old fashioned & comforting, sure to make your guests feel right at home. Plus, it's easy to prepare ahead of time so you can focus on your guests instead of the food. I love to personalize them by cutting out the person's first initial in the pastry & placing it on top! Monogramming with food! I love it!  Ingredients:
2 boneless, skinless Chicken Breasts
1 pkg Puff Pastry (2 sheets)
1 medium Yellow Onion
1 small Carrot, chopped
3 medium White Potatoes, peeled & chopped 1/4-1/2" cubes
1 cup frozen peas
4 cups Chicken Broth
8 tbsp Butter (1 stick)
1/4 cup Heavy Cream
1/3 cup Flour
1 tsp Chicken Bouillon Granules (or 1 cube)
Extra Virgin Olive Oil
Salt & Pepper
Directions:
Heat the oven to 350 degrees. Roast the chicken breasts (drizzled with olive oil & seasoned with salt & pepper) on a sheet pan for 30-35 minutes. Set aside to cool. Pull the puff pastry out of the freezer & allow to thaw on the counter. In a large pot or dutch oven (I used a 5.5 quart dutch oven) melt the butter over medium heat. Add the chopped onions & carrots. Cook until the onions are translucent & carrots are tender.  Lower the heat & add the flour. Cook until it's golden, about 2-3 minutes. Add the chicken broth & bouillon granules, salt & pepper; increase the heat to medium/high. Stir to combine well. Add the chopped potatoes. You don't want to have the potatoes any larger than 1/2" or they might not cook through. Cover the pan & reduce heat to low. When the chicken is out of the oven, heat the oven to 375 degrees. Chop (or shred) the chicken when it is cool enough to touch. Turn the heat off the pot & add the chicken, peas, & heavy cream. Stir well to incorporate. Check Seasoning & adjust to taste. Lay the thawed puff pasty on a lightly floured counter. Trace your bowls (empty) to see how they will fit, you may need to roll out the pastry some to stretch it. Cut your pastry for the topping. Divide the filling among 4 individual, oven proof dishes. Don't fill them to the top, your sauce will thicken while it bakes & it needs room to steam. Place them on a sheet pan.
Note: This is another slight adapted version of Ina Garten's (the Barefoot Contessa) Chicken Pot Pie.
Homemade Soft Pretzels with Jalapeno Cheese Sauce
Big, buttery, soft, warm, homemade pretzels! I watched Bobby Flay makes these on a Throw Down & knew that I had to try them. I was not definitely not disappointed! This recipe makes a wonderful pretzel. It has the texture of a traditional big soft pretzel & the buttery flavor of those delicious Auntie Anne's creations. They make a wonderful snack or appetizer & just wait till you try making sandwiches with them! Yum! The Jalapeno Cheese Sauce is perfect with them & so easy to make!  Ingredients:
(for the Pretzels)
(for the Pretzels)
4-4 1/2 cups All Purpose Flour
1 stick (1/2 cup) Butter, melted
1 1/2 cups warm Water
2 1/2 tsp Active, Dry Yeast
2 tbsp Light Brown Sugar
2 1/2 tsp Kosher Salt
1 tbsp Vegetable or Canola Oil
3/4 cup Baking Soda
1 egg beaten with 1/2 tbsp of Water
More Kosher Salt for top
(for the Jalapeno Cheese Sauce)
1 tbsp Butter
1 tsp All Purpose Flour
1 cup cup milk
3/4 cup White American Cheese, shredded
Jalapeno Pepper, chopped
Directions:
Directions:
Making this dough is easy & very similar to making pizza dough. In a small sauce pan, melt the stick of butter over low heat. In the bowl of an electric mixer, fitted with a dough hook, combine the yeast, brown sugar, warm water, & melted butter. Let it sit for about 5 minutes. Then on low speed, add 4 cups of flour reserving the last 1/2 cup. When the flour is incorporated, increase the speed to medium & knead for a few minutes, until the dough is smooth & not sticking to the sides. If the dough is too wet, add the rest of the flour, a little at a time. Dump the dough out onto a counter & knead a few times with your hands. Lightly oil the mixing bowl, add the dough, flipping to coat. Cover with a clean kitchen towel & let rise until it doubles in size. I always, pour hot water in a large bowl, put it on the bottom rack of my oven (turned off) and put my dough on the top shelf to rise. It seems to be the perfect, warm place for dough. I let the dough rise for about an hour. Then dumped it out on to my counter (with no extra flour or oil). If yours is too sticky, I would lightly oil the counter, with cooking spray or with more vegetable or canola oil. Preheat your oven to 425 degrees. Cut your dough in 8 even pieces. I made mine into a large circle & then sliced it into pie slices, like a pizza.
Labels:
appetizer,
breads,
Dips and Spreads,
Sauces,
Snack
Subscribe to:
Posts (Atom)
